

Use Kali Linux in an isolated VM for pentesting practice, Parrot Security OS if you want a lighter offensive environment, Ubuntu or Debian as your daily learning driver, and Qubes OS when compartmentalization is the goal. Before you open a single tool, create a VM, take a named snapshot, and treat that snapshot as your clean baseline. Every exercise starts from a known state and rolls back to it when you’re done. That one habit separates learners who make real progress from those who spend weekends rebuilding broken environments.
Your immediate next action: download Kali Linux (the industry-recognized standard for penetration testing, available as a VM image, WSL package, container, or ARM build), spin it up in VirtualBox or VMware, snapshot it, and pick one exercise from the list in Section 5. The NIST Cybersecurity Framework gives you the control vocabulary to map what you practice to what employers actually measure.
- Pentesting / ethical hacking: Kali Linux in an isolated VM
- Lighter offensive lab or privacy-aware testing: Parrot Security OS
- Daily learning, blue-team practice, scripting: Ubuntu 22.04 LTS or Debian Stable
- Compartmentalized work, high-sensitivity research: Qubes OS
Key Takeaways
Linux for cybersecurity requires a role-matched distro, deliberate CLI practice, and an isolated lab built around snapshots and documented baselines before any tool exploration begins.
| Point | Details |
|---|---|
| Match distro to your goal | Use Kali for pentesting, Ubuntu/Debian for daily learning, Qubes for compartmentalization. |
| Snapshot before every exercise | A named, dated snapshot is your reset point; without it, a broken lab costs hours to rebuild. |
| CLI tools are the real work | grep, ss, tcpdump, and Bash scripting cover the majority of real SOC and IR tasks. |
| Map practice to NIST functions | Framing your lab work against Identify, Protect, Detect, Respond, and Recover aligns skills to employer expectations. |
| Blueteam-academy for structured progression | When self-study stalls, the Threat & Control Method curriculum provides job-relevant sequencing and 12-month lab access. |
Table of Contents
- Core Linux skills every cybersecurity learner must build first
- Which distro should you pick for your security goal?
- How to set up a safe, isolated practice lab
- A hands-on learning path: your first projects and tools
- Hardening and blue-team basics every learner should apply
- How employers and SOCs actually use Linux skills
- What I would do if I were learning Linux for cybersecurity right now
- When structured training accelerates your progress
- Authoritative docs, tool pages, and practice platforms to bookmark
- Sources
Core Linux skills every cybersecurity learner must build first
Linux command-line fundamentals are not optional background knowledge. They are the actual work. When a SOC analyst triages an alert at 2 AM, they are running grep, ss, and lsof, not clicking through a GUI. Build these skills deliberately, in this order.
Command-line navigation and file inspection
Start with orientation commands: pwd shows where you are, ls -la reveals hidden files and permissions, cd moves you around. For file inspection, cat and less are your first tools, but file and strings matter more than most tutorials admit. Running strings /usr/bin/suspicious_binary on an unknown executable is a real first-response move, not an advanced trick.
File system layout and permissions
The directories that matter most in security work are /etc (configuration), /var/log (logs), /proc (live process and kernel state), and /tmp (where malware loves to land). Permissions follow the rwx model for owner, group, and others. The dangerous ones are SUID and SGID bits, which let a file run with elevated privileges regardless of who executes it.

Find every SUID binary on a system with:
find / -perm -4000 -type f 2>/dev/null
That output is a privilege-escalation checklist. Any binary there that doesn’t belong is worth investigating.
Text processing and log analysis
grep, awk, and sed are the core of log triage. A pipeline like:
grep "Failed password" /var/log/auth.log | awk '{print $11}' | sort | uniq -c | sort -rn | head -20
produces a ranked list of IP addresses hammering SSH, in under two seconds. Mastering these three tools converts log analysis from a manual slog into a repeatable script. Native UNIX tools for log parsing and real-time monitoring often produce faster, usable intelligence during live events than complex GUI workflows.
Networking commands
ip a shows interfaces and addresses. ss -tulpn lists every listening socket with the process behind it. tcpdump -i eth0 -nn -w capture.pcap captures traffic for offline analysis. These three commands cover the first five minutes of most network-based incident response tasks.
Basic Bash scripting
A short script that pings a /24 subnet and logs responding hosts is a better first Bash project than any tutorial exercise:
#!/bin/bash
for i in $(seq 1 254); do
  ping -c 1 -W 1 192.168.1.$i &>/dev/null && echo "192.168.1.$i is up"
done
Write it, run it in your lab, then modify it to log results to a timestamped file. That’s the habit loop that builds scripting fluency.
Package management
On Debian/Ubuntu systems, apt update && apt upgrade keeps your lab current. apt list --installed audits what’s on the system. On Red Hat-family systems, dnf replaces apt. Keeping your lab OS patched matters because you’ll be testing hardening techniques against a known baseline, and an unpatched host undermines every experiment.
Pro Tip: Name every VM snapshot with a date and a state description, for example kali-clean-2026-06-01 or ubuntu-post-nmap-install. Vague names like “snapshot1” become useless within a week. A clear naming convention means you can roll back to any exact state in under a minute.
| Skill area | Key commands | Security use case |
|---|---|---|
| Navigation & inspection | pwd, ls -la, cat, strings |
Initial triage, unknown file analysis |
| Permissions & SUID | find / -perm -4000 |
Privilege escalation auditing |
| Log analysis | grep, awk, sed, pipelines |
Threat hunting, incident triage |
| Network inspection | ip a, ss -tulpn, tcpdump |
Live connection auditing, packet capture |
| Scripting | Bash loops, conditionals | Automation of repetitive security tasks |
| Package management | apt, dnf |
Lab maintenance, dependency control |
Which distro should you pick for your security goal?
Independent testing groups categorize security distributions by purpose: Qubes for compartmentation, Tails and Kodachi for anonymity, Parrot and Kali for penetration testing. The right choice depends on your role, not on which distro sounds most impressive.
Kali Linux
The standard for offensive security work. Kali ships with hundreds of pre-installed tools organized into metapackages (web apps, wireless, forensics, reverse engineering), which cuts setup time significantly. Its documentation is thorough, its community is large, and every major pentesting certification references it. The trade-off: Kali is not a safe daily driver. Running it as your primary OS means your offensive tools are always present, which is a risk most professionals avoid by keeping Kali in a dedicated VM.
Best for: Penetration testing, CTF competitions, offensive tool practice
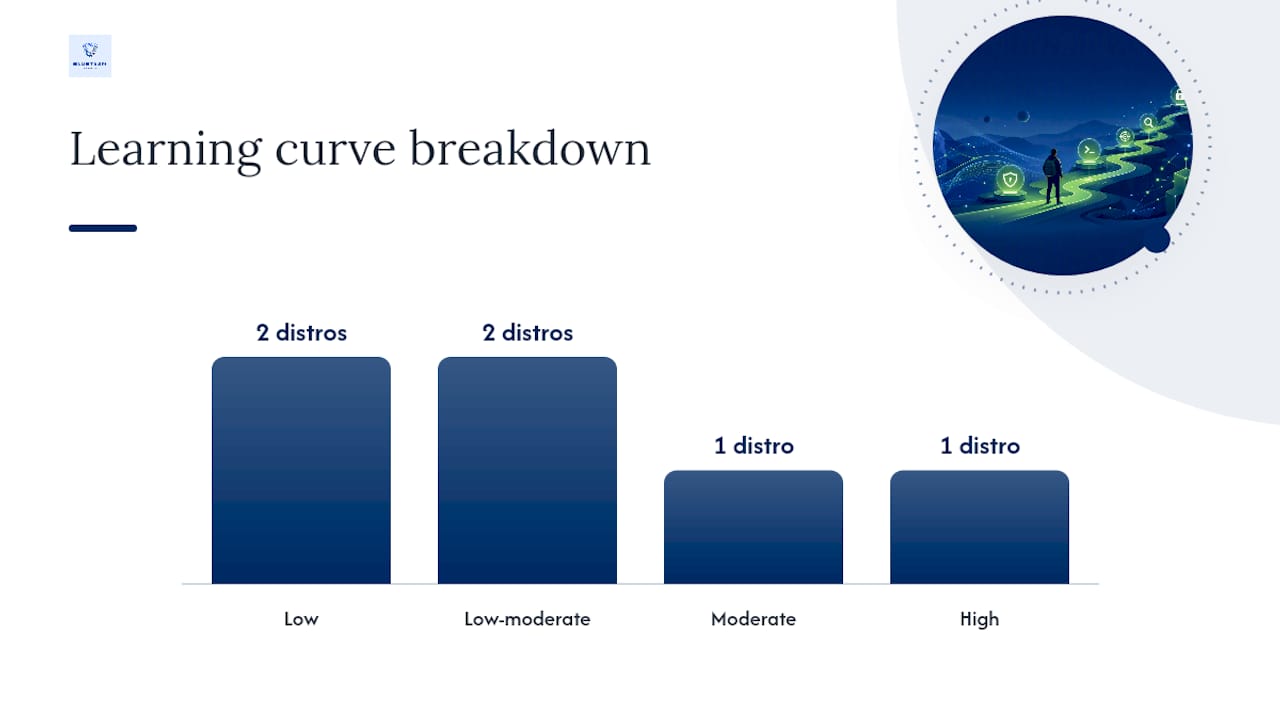
Learning curve: Moderate. The tools are there; knowing which to use and when takes time.
Pros: Massive tool library, excellent docs, VM/WSL/container deployment options
Cons: Not hardened by default, poor choice as a daily OS
Parrot Security OS
Parrot is lighter than Kali and ships with a privacy-oriented home edition alongside its security edition. The interface is more approachable for beginners, and the system runs well on modest hardware. It includes Anonsurf for routing traffic through Tor, which makes it useful for privacy-aware testing scenarios. The tool selection overlaps heavily with Kali, though Kali’s metapackage system gives it an edge for serious lab builds.
Best for: Beginners who want offensive tools without Kali’s weight, privacy-aware testing
Learning curve: Slightly lower than Kali
Pros: Lighter resource footprint, privacy features built in, beginner-friendly UI
Cons: Smaller community than Kali, less frequently referenced in cert training
Ubuntu / Debian
For daily learning, blue-team practice, and scripting work, Ubuntu LTS or Debian Stable is the right base. Both are stable, well-documented, and close to what you’ll find on production servers. Ubuntu 22.04 LTS is a particularly good choice because most enterprise Linux environments run RHEL or Debian-family systems, and the skills transfer directly. You add security tools as you need them, which also teaches you how those tools are installed and configured.
Best for: Daily learning, blue-team and defensive practice, scripting, server administration skills
Learning curve: Low to moderate
Pros: Stable, production-realistic, huge community, strong documentation
Cons: No pre-installed security tools; you build the environment yourself (which is actually a learning advantage)
Qubes OS
Qubes runs each application or task in a separate VM called a qube, enforced by the Xen hypervisor. Compromising one qube does not compromise others. This architecture makes Qubes the right choice for high-sensitivity research, handling untrusted files, or any work where compartmentalization is the primary requirement. The trade-off is hardware demand and a steep learning curve.
Best for: Compartmentalized work, high-sensitivity research, advanced privacy
Learning curve: High
Pros: Strong isolation by design, excellent for handling untrusted content
Cons: Demanding on hardware, complex setup, not beginner-friendly
Tails and Kodachi
Both are live-boot distributions designed for anonymity. Tails routes all traffic through Tor and leaves no trace on the host machine. Kodachi bundles Tor, VPN routing, and a dashboard that makes anonymity configuration accessible without deep technical knowledge. Neither is a learning environment for security skills; they are operational tools for privacy-sensitive tasks.
| Distro | Best for | Learning curve | Pre-installed tools | VM friendly |
|---|---|---|---|---|
| Kali Linux | Pentesting, CTFs | Moderate | Extensive offensive suite | Yes |
| Parrot Security | Beginner offensive, privacy | Low-moderate | Good offensive + privacy | Yes |
| Ubuntu / Debian | Daily learning, blue team | Low | None (build as needed) | Yes |
| Qubes OS | Compartmentalization | High | Moderate (per-qube) | Partial |
| Tails | Anonymity, no-trace work | Low | Privacy-focused | Yes (with caveats) |
| Kodachi | Daily privacy operations | Low-moderate | Privacy + anonymity suite | Yes |
How to set up a safe, isolated practice lab
A lab that leaks traffic to your production network, or that runs on your host OS without isolation, is not a lab. It’s a liability. Build this correctly once and every future exercise runs cleanly.
Step-by-step lab setup
- Choose your hypervisor. VirtualBox is free and works on Windows, macOS, and Linux. VMware Workstation Pro offers better performance and snapshot management. WSL2 is useful for command-line practice but lacks full network isolation. For serious lab work, VirtualBox or VMware is the right choice.
- Download verified ISOs. Always verify the SHA256 checksum against the official distro site before installing. A corrupted or tampered ISO is a real risk when downloading from mirrors.
- Create your attacker VM. Install Kali or Parrot, allocate at least 4 GB RAM and 40 GB disk, and take your first snapshot immediately after the OS is installed and updated. Label it
clean-install-YYYY-MM-DD. - Create your target VM. Use a deliberately vulnerable machine such as Metasploitable 2, or a fresh Ubuntu Server install that you harden incrementally. This is your practice target.
- Configure network isolation. Set both VMs to use an internal network or host-only adapter in VirtualBox. This prevents any traffic from reaching your production network or the internet from the target VM.
- Take a snapshot of the target VM before any exercise. Roll back after each session to maintain a clean target state.
- Document your baseline. Before any experiment, run
ss -tulpnandip aon both VMs and save the output. Knowing what “normal” looks like is the foundation of anomaly detection.
Network isolation options
- Host-only: VMs can talk to each other and to the host, but not to the internet. Good for most lab exercises.
- Internal network: VMs can only talk to each other. No host access, no internet. Use this for attack/defense simulations where you want full isolation.
- NAT: VM can reach the internet through the host but is not directly reachable. Useful for downloading tools inside a VM, but not for attack simulations.
Pro Tip: If you have a spare switch and two physical machines, put your lab on a dedicated VLAN or a physically separate network segment. Document the baseline network state (ARP table, open ports, running services) before any experiment. That documented baseline is what you compare against when you’re hunting for changes.
Safe practice checklist
- Never test tools or techniques on systems you don’t own or have explicit written permission to test.
- Keep your host OS fully patched, separate from lab activity.
- Use snapshots before every exercise; roll back after.
- Keep a lab journal: date, exercise, tools used, findings, and what you’d do differently.
- For hands-on cybersecurity labs, use purpose-built vulnerable VMs or legal practice platforms, never live production systems.
A hands-on learning path: your first projects and tools
The goal of this sequence is deliberate skill-building, not tool collection. Each project produces a concrete artifact (a script, a report, a capture file) that proves you can do the task, not just read about it.
Ordered starter projects
- File system triage exercise. On a fresh Ubuntu VM, find all SUID binaries, list all world-writable directories, and identify files modified in the last 24 hours. Commands:
find / -perm -4000 2>/dev/null,find / -perm -o+w -type d 2>/dev/null,find / -mtime -1 2>/dev/null. Document every finding. - Process and connection triage. Run
ps aux,ss -tulpn, andlsof -ion the same VM. Build a table of every listening process: PID, user, port, binary path. This is the first five minutes of host-based incident response. - Log hunting challenge. Install
fail2banon your Ubuntu VM, generate failed SSH login attempts from your Kali VM, then parse/var/log/auth.logwith agrep | awk | sort | uniq -cpipeline to identify the source IP and attempt count. Expected outcome: a one-liner that produces a ranked attacker IP list. - Host discovery with Nmap. On your isolated internal network, run
nmap -sn 192.168.x.0/24to discover live hosts, thennmap -sV -O <target_ip>for service and OS fingerprinting. The OWASP Web Security Testing Guide provides a methodology for extending this into web application testing once you have a target running a web service. - Packet capture and analysis. Run
tcpdump -i eth0 -nn -w lab.pcapon your Kali VM while generating HTTP traffic from the target. Open the capture in Wireshark and identify the HTTP GET requests. Expected outcome: you can read a pcap and extract a credential or session token from cleartext traffic. - Simple automation project. Write a Bash script that runs
nmap -snon your lab subnet, saves the output to a timestamped file, and emails you (or writes to a log) when a new host appears. This is a stripped-down version of what network monitoring tools do. - Basic forensics task. Install Autopsy or run Volatility against a memory image from a practice scenario (several are available on VulnHub and similar platforms). Identify a running process, extract its network connections, and document the artifact chain.
Tools mapped to learning goals
- Nmap: Host discovery, port scanning, service fingerprinting
- tcpdump / Wireshark: Packet capture and protocol analysis
- netcat: Port testing, simple pivoting, banner grabbing
- grep / sed / awk: Log analysis and data extraction pipelines
- Volatility / Autopsy: Memory and disk forensics
Where to find legal practice targets
- VulnHub: Free downloadable vulnerable VMs, ranging from beginner to advanced
- TryHackMe: Guided, browser-based labs with structured learning paths; good for beginners
- Hack The Box: More challenging, less guided; better suited once you have the basics down
Hardening and blue-team basics every learner should apply
Security-focused distributions are optimized environments, not automatic security. Real protection comes from correct configuration, attack-surface reduction, and monitoring. These are the controls you should understand and be able to apply.
Patching and updates
On Debian/Ubuntu: sudo apt update && sudo apt upgrade -y. For automated patching, install unattended-upgrades and configure it to apply security updates automatically. Unpatched systems in your lab undermine every hardening experiment you run on them.
Firewall basics with ufw and nftables
ufw (Uncomplicated Firewall) wraps nftables in a simpler interface. A minimal hardening sequence:
sudo ufw default deny incoming
sudo ufw default allow outgoing
sudo ufw allow ssh
sudo ufw enable
That four-command sequence closes every inbound port except SSH. For more granular control, nftables lets you write explicit rule chains, which is worth learning once you’re comfortable with ufw.
Mandatory access control: SELinux and AppArmor
AppArmor (default on Ubuntu) and SELinux (default on RHEL/Fedora) enforce per-process policies that limit what a compromised application can do. Check AppArmor status with sudo aa-status. Profiles in enforce mode block policy violations; profiles in complain mode log them. Start by reviewing which profiles are enforced on your Ubuntu lab VM, then put a test application into enforce mode and observe what breaks.
Logging, auditing, and SIEM basics
Logs live in /var/log/. The most useful for security work are auth.log (authentication events), syslog (general system events), and kern.log (kernel messages). Install auditd to capture fine-grained system call events:
sudo apt install auditd
sudo auditctl -w /etc/passwd -p wa -k passwd_changes
That rule logs every write or attribute change to /etc/passwd. Forward logs to a central collector using rsyslog or a lightweight SIEM agent. Even a simple Elastic Stack (Elasticsearch, Logstash, Kibana) running on a separate VM in your lab gives you a realistic SIEM environment to practice with.
Host-based detection tools
- rkhunter: Scans for rootkits, backdoors, and suspicious file permissions. Run
rkhunter --checkafter establishing a clean baseline. - AIDE (Advanced Intrusion Detection Environment): Builds a cryptographic database of file hashes at baseline, then alerts on changes. Initialize with
sudo aideinit, then runsudo aide --checkafter any system change.
Pro Tip: Enable immutable logging by sending logs to a collector that the host being tested cannot write to or delete from. If an attacker compromises your test VM and clears local logs, your remote collector still has the evidence. This is the same principle SOC teams use in production environments.
How employers and SOCs actually use Linux skills
The NIST Cybersecurity Framework organizes defensive work into five functions: Identify, Protect, Detect, Respond, and Recover. Every Linux skill in this article maps directly to one of those functions. Log analysis and auditd sit in Detect. Patching and ufw sit in Protect. Forensics tools sit in Respond. When you frame your Linux practice against NIST outcomes, you’re speaking the language hiring managers and SOC leads use to evaluate candidates.
What SOC analysts actually do with Linux: They parse authentication logs to detect brute-force attempts, inspect socket tables to identify unexpected outbound connections, capture packets to reconstruct attack timelines, and write Bash scripts to automate repetitive triage tasks. The tools are
grep,ss,tcpdump, and a text editor. The skill is knowing what to look for and how to interpret what you find.
Employers listing Linux skills in security job postings typically expect:
- Proficiency with CLI tools for log parsing and process inspection
- Ability to write or modify Bash scripts for automation
- Familiarity with at least one firewall management tool (
ufw,firewalld, ornftables) - Understanding of file permissions, SUID risks, and basic privilege escalation vectors
- Experience with packet capture and basic protocol analysis
The cybersecurity career path for IT professionals maps these skills to specific job titles and salary bands, which is worth reviewing once you’ve built a baseline in the lab.
Defenders should prioritize log analysis, auditing, and containment; attackers should prioritize reconnaissance, scanning, and exploit chains. Curriculum and self-study should sequence skills to match those job tasks, not just cover tools in alphabetical order.
What I would do if I were learning Linux for cybersecurity right now
If I were starting this week, I’d spend the first three days entirely in the terminal on an Ubuntu VM, no GUI tools. Navigation, permissions, log parsing, and one working Bash script. Not because it’s the most exciting work, but because every advanced task later depends on this being automatic.
Days four and five: spin up Kali in a second VM on an internal-only network, run nmap against the Ubuntu VM, and read every line of the output. Then capture the scan traffic with tcpdump and open it in Wireshark. That single exercise connects three tools and two protocols in a way that no tutorial can replicate.
Week two: pick one vulnerable VM from VulnHub, work through a full reconnaissance-to-exploitation sequence, and write up every step. The write-up matters as much as the exercise. Documenting what you did, what worked, and what didn’t is how you build a portfolio and how you retain the knowledge.
A short action list you can copy into your study notes:
- Day 1: Create Ubuntu VM, snapshot it, practice 10 CLI commands with real output
- Day 2: Find all SUID binaries, document them, research two you don’t recognize
- Day 3: Write a host-discovery Bash script, run it on your lab network
- Day 4: Install Kali in a second VM, configure internal network, run first Nmap scan
- Day 5: Capture the Nmap scan with tcpdump, open in Wireshark, identify the SYN packets
- Week 2: Download one VulnHub VM, complete a full recon-to-exploit sequence, write it up
- Week 3: Add
auditdto Ubuntu VM, generate events, parse them withgrepandawk
Progress is measurable: you either produced an artifact (a script, a capture, a write-up) or you didn’t. That’s a cleaner signal than hours spent reading.
When structured training accelerates your progress
Self-study works well when you have time, discipline, and a clear sense of what to practice next. It stalls when you hit a concept that requires context you don’t yet have, or when you’re not sure whether what you’re doing is actually job-relevant. That’s the gap structured training fills.
Blueteam-academy is built specifically for IT professionals making the move into cybersecurity. The courses are built around the Threat & Control Method, a practical decision-making framework that ties every technical control to a real threat scenario, so you’re not just learning tools in isolation. You get recorded classes, templates you can apply immediately, peer-reviewed content, and 12 months of access so you can revisit material as your skills grow.
If you’re weighing self-study against a structured course, the honest criteria are: Do you have a clear learning sequence, or are you jumping between tutorials? Do you have a way to measure whether your skills are job-ready? If the answer to either is no, a structured program with practical labs and a defined curriculum is worth the investment. Browse the available cybersecurity courses to see which track fits your current role and target position.
Authoritative docs, tool pages, and practice platforms to bookmark
Use these sources for official documentation, methodology references, and legal practice environments. All are free to access.
- Kali Linux official docs: Installation guides, metapackage lists, and deployment options for VM, WSL, container, and ARM builds. Start here for any Kali setup question.
- NIST Cybersecurity Framework: The reference framework for mapping technical controls to organizational outcomes. Read the core document once; use the subcategory tables as a checklist for lab exercises.
- OWASP Web Security Testing Guide: The authoritative methodology for web application security testing. Use it to structure any web-focused lab exercise.
- CyberSec4Europe distro comparison: Independent categorization of security distributions by purpose, with usability and documentation notes.
- freeCodeCamp Linux basics guide: A practical, command-focused introduction to Linux for security work. Good for filling gaps in CLI fundamentals.
- VulnHub: Free downloadable vulnerable VMs for offline lab practice. Legal, isolated, and well-documented. Use these as your primary practice targets.
- TryHackMe: Browser-based guided labs with structured learning paths. Particularly useful for beginners who want scaffolded exercises before going freeform.
- Hack The Box: Less guided, more realistic. Move here once you can complete a full recon-to-exploit sequence independently.
Always run practice exercises in an isolated lab environment. Testing tools or techniques on systems you don’t own or have explicit written permission to test is illegal under the Computer Fraud and Abuse Act, regardless of intent.
Sources
- Kali Linux | Penetration Testing and Ethical Hacking Linux Distribution
- Linux Basics for Hackers: Commands For Cybersecurity
- Nist
- Linux distributions for security and privacy – CyberSec4Europe | Cyber Security for Europe
- Owasp
